In this tutorial we will learn how to create a basic JPA Spring Boot application that uses PostgreSQL as database. We will include a REST Controller and the Thymeleaf engine so that you can test your JPA Application in both ways.
Setting up the Project
Firstly, we will kickstart the Spring Boot project. The simplest way to do that is by means of the Spring Initializr online application.
Add the following dependencies, as you can see from the following picture:
- Spring Data JPA
- Validation
- Postgres Database ( or the Database you are using)
- Spring Web
- Thymeleaf template engine

Alternatively, if you are using the Spring CLI, you can init the project as follows:
$ spring init -dweb,data-jpa,postgresql,validation, thymeleaf spring-crud-postgres
What is Thymeleaf? In a nutshell, Thymeleaf is an XML/XHTML/HTML5 template engine written in Java which is able to apply a set of transformations to template files in order to display data and/or text produced by your applications.
The following dependencies will be added to your pom.xml file:
<dependencies>
  <dependency>
    <groupId>org.springframework.boot</groupId>
    <artifactId>spring-boot-starter-data-jpa</artifactId>
  </dependency>
  <dependency>
    <groupId>org.springframework.boot</groupId>
    <artifactId>spring-boot-starter-thymeleaf</artifactId>
  </dependency>
  <dependency>
    <groupId>org.springframework.boot</groupId>
    <artifactId>spring-boot-starter-web</artifactId>
  </dependency>
  <dependency>
    <groupId>org.springframework.boot</groupId>
    <artifactId>spring-boot-starter-validation</artifactId>
  </dependency>
  <dependency>
    <groupId>org.postgresql</groupId>
    <artifactId>postgresql</artifactId>
    <scope>runtime</scope>
  </dependency>
  <dependency>
    <groupId>org.springframework.boot</groupId>
    <artifactId>spring-boot-starter-test</artifactId>
    <scope>test</scope>
  </dependency>
</dependencies>
Important: Until Spring Boot version 2.2 the starter spring-boot-starter-web had as dependency the starter spring-boot-starter-validation. In Spring Boot 2.3 the starter spring-boot-starter-validation is NOT a dependency of the starter spring-boot-starter-web anymore so you need to add it explicitly.
Finally, import the project in your IDE before we move to the next steps. You can read more about Spring Boot IDE here: Choosing the IDE for Spring Boot development
Defining the Entity Class
An entity in JPA represents a table in the database. To create an entity, we need to create a Java class and annotate it with @Entity. Each field in the class represents a column in the table. The following code defines an entity called Customer with three fields: id, name, surname and email:
@Entity
public class Customer {

    @Id
    @GeneratedValue(strategy = GenerationType.AUTO)
    private long id;

    @NotBlank(message = "Name is required")
    private String name;

    @NotBlank(message = "Surname is required")
    private String surname;

    @NotBlank(message = "Email is required")
    private String email;

    // Getter/ Setters omitted for brevity

}
The Customer class is annotated with @Entity, which indicates that it is a JPA entity.
It has four fields: id, name, surname, and email.
The id field is annotated with @Id and @GeneratedValue, which indicates that it is the primary key of the entity and its value will be generated automatically.
The name, surname, and email fields are annotated with @NotBlank, which means that they cannot be empty.
When you let Hibernate auto-generate the Class, you will end up with the following Table in the PostgreSQL schema:

Creating the repository
The repository is a layer between the database and the application that provides an interface for performing CRUD (create, read, update, delete) operations on the Person entity. To create a repository, we need to create an interface that extends the JpaRepository interface. The JpaRepository interface provides methods for performing basic CRUD operations and pagination.
@Repository
public interface CustomerRepository extends JpaRepository<Customer, Long> {

    List<Customer> findByName(String name);

}
As you can see from the above code, we are including only an extra method findByName to search a Customer by surname.
Creating the Controller
The controller is responsible for handling incoming HTTP requests and returning the appropriate response.
This controller defines several endpoints for performing CRUD operations on Person objects. The @RestController annotation indicates that this class is a controller and the @RequestMapping annotation specifies the base path for the endpoints defined in the class
@Controller
public class CustomerController {
  private final CustomerRepository customerRepository;

  @Autowired
  public CustomerController(CustomerRepository customerRepository) {
    this.customerRepository = customerRepository;
  }

  @GetMapping("/new")
  public String showSignUpForm(Customer customer) {
    return "add-customer";
  }

  @GetMapping("/edit/{id}")
  public String showUpdateForm(@PathVariable("id") long id, Model model) {
    Customer customer =
        customerRepository
            .findById(id)
            .orElseThrow(() -> new IllegalArgumentException("Invalid customer Id:" + id));
    model.addAttribute("customer", customer);
    return "update-customer";
  }

  @GetMapping("/delete/{id}")
  public String deleteUser(@PathVariable("id") long id, Model model) {
    Customer customer =
        customerRepository
            .findById(id)
            .orElseThrow(() -> new IllegalArgumentException("Invalid customer Id:" + id));
    customerRepository.delete(customer);
    model.addAttribute("customers", customerRepository.findAll());
    return "index";
  }

  @PostMapping("/addcustomer")
  public String addUser(@Valid Customer customer, BindingResult result, Model model) {
    if (result.hasErrors()) {
      return "add-customer";
    }
    customerRepository.save(customer);
    model.addAttribute("customers", customerRepository.findAll());
    return "index";
  }

  @PostMapping("/update/{id}")
  public String updateUser(
      @PathVariable("id") long id, @Valid Customer customer, BindingResult result, Model model) {
    if (result.hasErrors()) {
      customer.setId(id);
      return "update-customer";
    }
    customerRepository.save(customer);
    model.addAttribute("customers", customerRepository.findAll());
    return "index";
  }
}
As you can see, this Controller class manages all aspects of the Entity through REST mappings.
Finally, we will add a Spring Boot view so that you can manage the application through the browser as well. We will build the view using the Thymeleaf engine.
Building the Spring Boot view
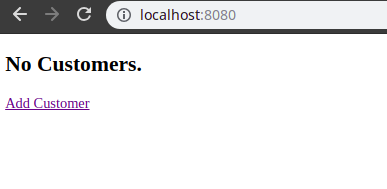
We will now add the HTML pages using the Thymeleaf engine. First off, the index.html page which list the existing Customers:
<body>
    <div th:switch="${customers}">
        <div class="row">
            <div>
                <h2 th:case="null">No Customers.</h2>
                <div th:case="*">
                    <h2>Customers</h2>
                    <table border="1">
                        <thead>
                            <tr>
                                <th>Name</th>
                                <th>Surname</th>
                                <th>Email</th>
                                <th>Edit</th>
                                <th>Delete</th>
                            </tr>
                        </thead>
                        <tbody>
                            <tr th:each="customer : ${customers}">
                                <td th:text="${customer.name}"></td>
                                <td th:text="${customer.surname}"></td>
                                <td th:text="${customer.email}"></td>
                                <td>
                                    <a th:href="@{/edit/{id}(id=${customer.id})}">EDIT</a>
                                </td>
                                <td>
                                    <a th:href="@{/delete/{id}(id=${customer.id})}">DELETE</a>
                                </td>
                            </tr>
                        </tbody>
                    </table>
                </div>
                <p>
                    <a href="/new">Add Customer</a>
                </p>
            </div>
        </div>
    </div>
</body>
And now two pages, the add-customer.html page to insert a new Customer:
<body>
    <div>
        <h2>New Customer</h2>
        <div>
            <div>
                <form action="#" th:action="@{/addcustomer}" th:object="${customer}" method="post">
                    <div class="row">
                        <div >
                            <label for="name">Name</label>
                            <input type="text" th:field="*{name}" id="name" placeholder="Name">
                                <span th:if="${#fields.hasErrors('name')}" th:errors="*{name}" ></span>
                            </div>
                            <div >
                                <label for="surname">Surname</label>
                                <input type="text" th:field="*{surname}" id="surname" placeholder="Surname">
                                    <span th:if="${#fields.hasErrors('surname')}" th:errors="*{surname}" ></span>
                                </div>
                                <div >
                                    <label for="email">Email</label>
                                    <input type="text" th:field="*{email}" id="email" placeholder="Email">
                                        <span th:if="${#fields.hasErrors('email')}" th:errors="*{email}" ></span>
                                    </div>
                                </div>
                                <div class="row">
                                    <div >
                                        <input type="submit" value="Add Customer">
                                        </div>
                                    </div>
                    </form>
                </div>
            </div>
        </div>
</body>
And the update-customer.html to Edit an existing customer:
<body>
    <div>
        <h2>Update Customer</h2>
        <div class="row">
            <div>
                <form action="#" th:action="@{/update/{id}(id=${customer.id})}" th:object="${customer}" method="post">
                    <div class="row">
                        <div>
                            <label for="name" >Name</label>
                            <input type="text" th:field="*{name}" id="name" placeholder="Name">
                                <span th:if="${#fields.hasErrors('name')}" th:errors="*{name}" ></span>
                            </div>
                            <div>
                                <label for="surname" >Surname</label>
                                <input type="text" th:field="*{surname}" id="surname" placeholder="Name">
                                    <span th:if="${#fields.hasErrors('surname')}" th:errors="*{surname}" ></span>
                                </div>
                                <div>
                                    <label for="email" >Email</label>
                                    <input type="text" th:field="*{email}" id="email" placeholder="Email">
                                        <span th:if="${#fields.hasErrors('email')}" th:errors="*{email}" ></span>
                                    </div>
                                </div>
                                <div class="row">
                                    <div class="col-md-6 mt-5">
                                        <input type="submit" class="btn btn-primary" value="Update Customer">
                                        </div>
                                    </div>
                    </form>
                </div>
            </div>
        </div>
</body>
The Spring Boot Application Class
Finally, make sure your application includes a SpringBootApplication Class to start the project:
package com.example.cruddemo;

import org.springframework.boot.SpringApplication;
import org.springframework.boot.autoconfigure.SpringBootApplication;

@SpringBootApplication
public class DemoApplication {
  public static void main(String[] args) {
    SpringApplication.run(DemoApplication.class, args);
  }
}
Configuring Spring Boot to use PostgreSQL
Done with the application, let’s add the configuration needed to configure PostgreSQL connectivity into application.properties:
spring.datasource.url=jdbc:postgresql://localhost:5432/postgres
spring.datasource.username=postgres
spring.datasource.password=postgres

#drop n create table again, good for testing, comment this in production
spring.jpa.hibernate.ddl-auto=create
spring.jpa.show-sql=true
spring.jpa.database=POSTGRESQL
spring.jpa.properties.hibernate.jdbc.lob.non_contextual_creation=true
We have assumed that PostgreSQL is running on localhost on the default port. You can start an instance of PostgreSQL with docker as follows:
docker run --rm=true --name spring_boot_demo -e POSTGRES_USER=postgres -e POSTGRES_PASSWORD=postgres -e POSTGRES_DB=postgres -p 5432:5432 postgres
If you prefer, you can have your Maven project to start the PostgreSQL Database for you automaticall, by including the fabric8-docker-plugin in your pom,xml:
<?xml version="1.0" encoding="UTF-8"?><plugin>

   <groupId>io.fabric8</groupId>

   <artifactId>docker-maven-plugin</artifactId>

   <version>0.33.0</version>

   <configuration>

      <skip>false</skip>

      <images>

         <image>

            <name>postgres</name>

            <alias>postgresql</alias>

            <run>

               <env>

                  <POSTGRES_USER>postgres</POSTGRES_USER>

                  <POSTGRES_PASSWORD>postgres</POSTGRES_PASSWORD>

                  <POSTGRES_DB>postgres</POSTGRES_DB>

               </env>

               <ports>

                  <port>5432:5432</port>

               </ports>

               <log>

                  <prefix>PostgreSQL:</prefix>

                  <date>default</date>

                  <color>cyan</color>

               </log>

               <wait>

                  <tcp>

                     <mode>mapped</mode>

                     <ports>

                        <port>5432</port>

                     </ports>

                  </tcp>

                  <time>10000</time>

               </wait>

            </run>

         </image>

      </images>

   </configuration>

   <executions>

      <execution>

         <id>docker-start</id>

         <phase>test-compile</phase>

         <goals>

            <goal>stop</goal>

            <goal>start</goal>

         </goals>

      </execution>

      <execution>

         <id>docker-stop</id>

         <phase>post-integration-test</phase>

         <goals>

            <goal>stop</goal>

         </goals>

      </execution>

   </executions>

</plugin>
Now build your application then you can run it as usual with java -jar or with:
$ mvn install spring-boot:run
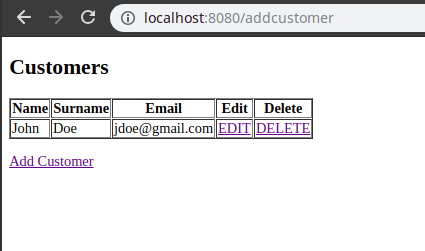
And here’s our application in action (graphic really essential!)
Home Page:
Add a new Customer:

Customer list with Edit/Delete:
Conclusion
This article was a walkthrough Spring Boot and JPA using PostgreSQL as database.
You can find the source code for this article here: https://github.com/fmarchioni/masterspringboot/tree/master/crud/spring-crud-postgres/cruddemo
Found the article helpful? if so please follow us on Socials


